
Lesson learned, and a print-friendly button was promptly installed.
If you’ve ever tried printing out a web page straight from the browser, you’ll know it’s rarely printed in the same form in which it appears in a web browser. Often you’ll get elongated links spread out over several pages, text printed on top of other text, and other layout issues.
In addition, resources you might mention and link to within the post are just printed as a blue underlined link, with no printed reference on where the link is actually pointing to.
So … difficult to read, wasted ink and paper, and information loss. Not too conducive to building your authority and influence, is it?
You’d also be surprised how many people reading your blog – presuming it’s offering high-value, actionable information! – will want to print out a post, and stick it on the wall or on the desk for their reference. Or some will simply prefer reading offline.
If you don’t offer such an option, not only does it damage your authority and credibility, but also your potential reach, as a proportion of your readership will head elsewhere, in search of a more user-friendly experience on a blog that recognizes and respects their needs.
If your blog is already print-capable, great. If not, read on …
This post shows you exactly how to install a basic print plugin for WordPress that gives you an instant print-friendly button you can then have available for your visitors. It’s a five minute job, and once done it’s a permanent positive asset for your blog that will help you retain your readership, as well as extend your reach, authority and influence.
There are others available, but the plugin we’ll focus on is called WP-Print, the same one (at the time of writing) that’s in use on this blog, and provides the print option at the top of this post.
It’s been downloaded around 400,000 times, and has a rating of 4.3 out of 5 … so the signs are good that it will do just what we need, and not create any problems or security issues.
If you click the print option at the top for this post, you can see the kind of page it generates – clean, concise, and print-ready. Notice in particular how any links in the post are referenced at the bottom with the full URL provided.
Now find out how to quickly add this to your own blog via the following five simple steps …
1. Install the Plugin
Log into your blog, go to Plugins from the left-hand menu, and click the Add New link towards the top of the page:

Click the ‘Add New’ link …
Search for the WP-Print plugin via the search facility:

Search for wp-print …
You should then see the WP-Print plugin at the top of the listings – click the Install Now link provided.
Follow the instructions to add or confirm your FTP information, and the plugin should be automatically installed for you.
If you have any issues doing it this way, click here for their info page on WordPress, download the zip, decompress, and upload the entire wp-print directory to your /wp-content/plugins/ folder.
2. Activate It
Once installed, click Plugins again on the left-hand menu, and you should see the WP-Print plugin listed along with your other plugins.
Click to activate it as shown:
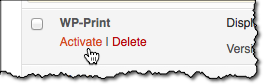
Click the Activate link …
3. Update Settings
Now it’s activated, go to Settings > Print from the left-hand menu to access the settings page for the plugin. They’re all fairly self-explanatory, but allow you for example to choose the graphic image you want for your print button, the link text to display, and what you want to be printed when a visitor clicks the print button.
4. Regenerate Your Permalinks
The plugin requires this step in order to fully function. Simply go to Settings > Permalinks, and click the Save Changes button.
5. Add To Your Theme
The theme of course governs the appearance of your blog, and you now need to add a small code snippet at the point where you want the print-friendly button to appear on your posts and pages.
You can edit your theme via WordPress’s built-in theme editor (Appearance > Editor) or via your normal webpage editing software – you’ll find the files for your theme at wp-content/themes/YOUR_THEME/ (always back up your existing files first!)
As an example, you can add the code snippet you need to the index.php page within your theme – look for the following code:
<?php while ( have_posts() ) : the_post(); ?>
And then add the following code below it:
<?php if(function_exists('wp_print')) { print_link(); } ?>
So the finished code might look something like this (with the added code shown in bold):
<?php while ( have_posts() ) : the_post(); ?>
                <?php if(function_exists('wp_print')) { print_link(); } ?>
                <?php get_template_part( 'content', get_post_format() ); ?>
<?php endwhile; ?>
However, you might like finer control of placement, and can instead add the same code snippet at an appropriate point in other theme files such as single.php, post.php, and so on. For this blog for example, it’s in the theme’s content.php file (this file is how the actual content is displayed for each post).
Experiment, play around with it, and see what works best for your blog!

