While you can find a full description along with installation instructions and other info on the plugin’s page within WordPress’s plugin directory, this post provides more of a visual tutorial on how to start taking advantage of it.
Firstly, a quick summary of what it does …
Normally with Guest Posting, you’ve got to find suitable blogs in your niche who might like to publish content from you, try to build positive relationships with those bloggers, and try to persuade the odd one or two to publish a post from you.
It works … but it can mean a big investment of time and effort in finding those opportunities.
Our Guest Post Plugin turns that on its head … instead of you seeking out those opportunities, they come to you. A blogger can arrive at your website, like what they read, and then see a link at the end of the post inviting them to request a free, 100% unique, professionally-written version of your blog post (created by our writers) that they can then publish on their own blog.
The blogger would publish the new post as a Guest Post on their own blog, and, as per usual Guest Posting practice, link back to your own site.
It’s virtually zero work for you (you just need to approve requests), and a very straightforward, streamlined process for them too in getting quality, unique content for their blog that they can use for free.
Click here for more information on exactly how it works (there’s no point repeating it all here) … now on with this tutorial …
1. Download the Plugin
Click the Download button from the plugin’s page on WordPress (click here)

2. Upload to your Blog
The download above will give you a zip file – decompress it and you’ll find a folder called vwriter-guest-post inside that contains everything you need.
Using your usual FTP software to upload files to your site, navigate to the /wp-content/plugins directory and upload the entire vwriter-guest-post directory there.
So once done, the site structure will be similar to the following:
httpdocs/wp-content/plugins/vwriter-guest-post
(Note: The httpdocs bit at the beginning may differ for different web hosts – it’s the rest of the path that’s the important part)
If you’re at all stuck, there’s an excellent tutorial on installing plugins available here.
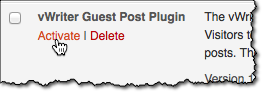
3. Activate the Plugin
Click Plugins via the side menu in WordPress, and locate the plugin (‘vWriter Guest Post’) in the list – you’ll likely have several listed. Click the Activate link provided to activate the plugin:
4. Create your vWriter.com Account
To use the plugin, you need a client account with vWriter.com – this means we can notify you when a request to use one of your blog posts as a Guest Post on someone else’s blog comes in, and is how the order for your blog post to be rewritten (thereby creating new, unique content for use in the Guest Post) will be placed.
If you haven’t yet set up your client account, you can get one here.
5. Add your Personal Settings to the Plugin
From your WordPress blog, go to Settings > vWriter Guest Post – you’ll see some instructions towards the top, and then some fields to set as follows:
- Scope If you check the box provided, the special link (where visitors can request a copy of the post to publish on their own blog, with links to your site) will be applied to all the posts on your blog – otherwise, if you leave it unchecked, you will be able to add the link to just the posts you choose.
- vWriter Client ID Click here to retrieve your client ID, and enter it into the field provided
- Pre-Text This is where you define the exact text you want to appear before the text at the end of your posts – you can also add any HTML code to this field (for example, <strong> or <i> tags to make the text bold or italics respectively):

- Anchor Text This defines the exact text you want to appear for the link:
![]()
Once done, click the Save Changes button at the bottom.
6. Authorize your Blog
This is where you add a new blog to your vWriter.com account, and authorize it to use the plugin – if you don’t authorize it, then people who click through from the link at the end of your posts will get an invalid type message instead:
- Add a new blog – you’ll need to enter your own name (unless already set in your account), and the URL of your blog. Don’t forget the http:// bit at the beginning. So for this blog, I’d enter http://blog.vwriter.com
- Authorize it – this simply means defining the bio box you want to be published at the end of any guest posts, and providing a profile picture if you wish:
- For the profile picture, we use the Gravatar service which links your email address to your profile picture in many places online, such as when you comment or post on a blog or on web forums – so you just need to enter the Gravatar email address associated with the profile picture you want to use (set up a Gravatar account here if you haven’t already). You can also choose not to use a profile pic if you’d prefer not to … but we’d recommend it, as it helps connect your readers to you as a real human being just like them, and can encourage click-through and an ongoing relationship
- An example bio is provided, so you just need to adjust it to suit the information you want to present to the world – for example, the bio I’ve currently set for this blog at the time of writing is as follows:

IMPORTANT: Please ensure you authorize your blog as described in this section, otherwise the plugin won’t work correctly on your blog.
That’s it!
You’re now all set up to start using this powerful guest posting functionality on your blog – and you can set it up on as many blogs as you wish, all through the same vWriter.com account.
Without the plugin of course, you’re leaving valuable guest posting opportunities on the table, along with the SEO, traffic and other benefits they bring … so make sure you install it on your own blog(s) today.

