
In this post, I show you a second and powerful way to put your RSS feed to work promoting and building visibility for your site. Again, it’s very easy to set up, only takes a few minutes, and once done works for you on auto-pilot on an ongoing basis … a.k.a. worth doing!
Presuming you’re on Twitter, Facebook or LinkedIn, this involves adding your blog’s RSS feed to your vWriter.com account and then driving traffic to your blog via your social media account(s) automatically. Every time your blog is updated with a new post, your Twitter, Facebook and/or LinkedIn feed will be be auto-updated too.
Of course, it doesn’t have to just be the RSS feed for your blog. If you publish videos on YouTube regularly for example, they provide you with a RSS feed you can plug into this too. Other services or websites where you publish regularly will also likely provide you with a RSS feed you can use.
This whole process should only take you 5-10 minutes max.
Initial Set Up
The initial set up just involves getting an account, and then adding one or more of your social profile(s) as required.
1. Grab a vWriter.com Account
If you haven’t got one already, go to vWriter.com and get your account. The easiest way is to click one of the social media buttons on the page. This will both set up your account and set your first social media profile within it.
Step 2 shows you how to add social media profile(s) from within your account …
2. Add Your Social Profile(s)
After logging in, add one or more social media profile(s) as required.
 If you clicked one of the social media buttons to create your account (Step 1 above), you should already have one within your account. If so, you can follow this step to add more profile(s) if you wish, or just move on to the next step below.
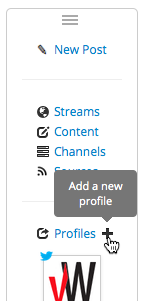
To add a new profile:
- Hover over the Profiles link on the left-hand menu – click on the plus icon ‘+’ that appears. As an alternative, click straight through on the Profiles link, and click the button on the next page to add a profile.
- Follow the simple instructions provided to add your profile. When you add a profile, an authorization window or web page will appear asking you to authorize vWriter.com. After you agree, your profile will be connected to your vWriter.com account. It only takes a few seconds per profile.
Repeat as required – for example, you may like to add your Twitter, Facebook and LinkedIn profiles in the same way. Of course, a new profile can be added at any time.
Create A Publishing Channel To Start Driving Traffic
Now you have your account set up, you can create a publishing channel based on your blog’s RSS feed, to auto-post content (whether auto-created or custom-written for you) to your social profiles and drive traffic back to your blog.
1. Add Your Blog’s RSS Feed
 Simply add your RSS feed to vWriter.com as a new ‘Content Source’.
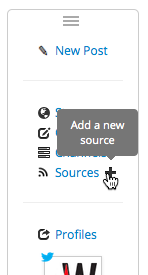
Adding a new feed only takes a few seconds:
- In a similar way to adding a profile above, hover over the Sources link on the left-hand menu, and click on the plus icon ‘+’ that appears. As before, you can alternatively click the Sources link and then click the button on the next page to add a new source.
- Add the link to your blog’s feed into the field provided. Assuming you have a WordPress blog, your feed will be at http://yoursite.com/feed. For example, this blog’s feed is at http://blog.vwriter.com/feed.
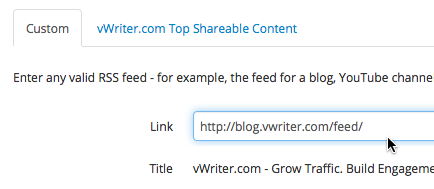
- Click Submit and that’s it.
Now you need to link your feed to a Publishing Channel to have your social media profile(s) auto-updated in line with your feed …
 2. Create a New Publishing Channel
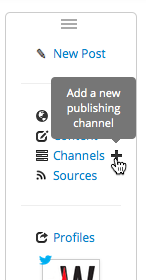
The last step is to add a new publishing channel to your account to take care of creating the content, based on your feed, that will be posted to your social profile(s).
- Similar to adding a new profile or source, click to add a new channel via the left-hand menu, as shown.
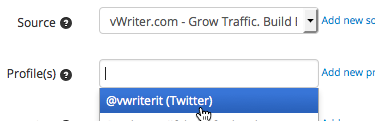
- Select the feed you’ve just added as the Source.

- Click the Profile(s) field and select one or more profiles that you want content to be published to, based on your feed. Note that by selecting purely Twitter profile(s), certain Twitter-specific settings (e.g. max character length) become available. This allows you to create publishing channels specially designed for the Twitter platform (for example, creating a series of scheduled, follow-up Tweets from each new content item).
- Choose or add a Project if you wish to help organize the publishing channel (e.g. you may have different channels for different sites or clients)
- Select or add a Link Shortener – this means the links will be auto-shortened for you, and allow you to track click-throughs, check engagement levels, and so on.
- Set the Content Length you’re looking for.
- For example, for a Twitter-only publishing channel, you can set the maximum character length here.
- Otherwise you can specify the minimum and maximum word count that you need.
- Enter Hashtags that you want to be included in the content.
- For Twitter-only channels, the hashtags you enter are treated as a ‘pool’ of hashtags to choose from. You can further specify if you want 1 or 2 of the hashtags you’ve entered to be incorporated into each Tweet.
- Otherwise the hashtags you enter will be auto-added to the end of the social post that’s created.
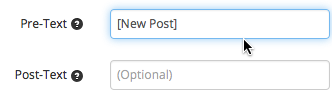
- You can optionally set pre- and post-text that you want added to each post that’s created – for example:
Source Flow Control
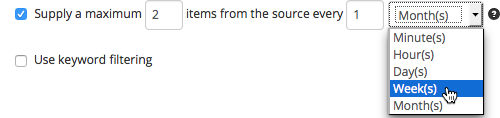
Of course, you might not want everything published to the feed converted into content for your social media profiles. The Source Flow Control settings allow you to control exactly what comes through:
- The frequency that you want the publishing channel to take items from your feed, for example:
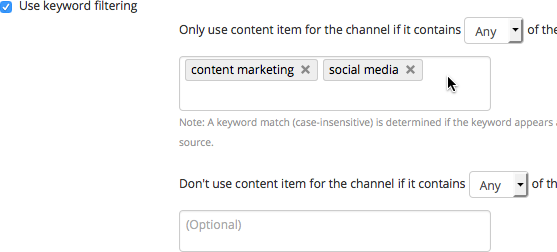
- Keyword filtering options, to fine-tune exactly what comes through your channel for publication:
You can also choose to start your channel with the most recently published item. So if you’ve set this up just after publishing your latest killer blog post, you can get going with that immediately.
Content Creation
Finally, set your content creation options. As mentioned above you can choose for content to be:
- Auto-created; and/or
- Custom-written
While in some circumstances it might be appropriate to simply have an auto-created post, you may also want to take advantage of the higher engagement levels that the custom-written option can bring.
vWriter.com foundations are as a content creation platform (you can also order other types of custom-written content through the site), with full facilities for e.g. building teams of writers, reviewing/approving written content, messaging, and so on.
If you do choose the custom-written option for a particular channel, it means that an order for custom-written content (e.g. one or more Tweets) is placed each time say a new post is published to your blog (depending on your Source Flow Control settings). You can choose for this order to be auto-placed or for your further review.
The system is also designed to give you hands-free operation, should you wish. So as well as auto-placing orders, you can also opt for auto-acceptance. That means that as soon as say a post for Facebook has been created based on your recently published blog post that came through the feed, it can be scheduled for publication to your Facebook account.
Furthermore, you can set optimal time windows for each of your social profiles, for when you want content to be published. For example, you may know your Facebook or Twitter account are particularly responsive at a certain time of day (or night) and so set time windows accordingly. That means the posts coming through your channel will be scheduled for these optimal times, achieving optimal visibility and driving maximum traffic from each published post.
In Conclusion
Hopefully you can see how easy it is to start driving traffic to your blog using your blog’s built-in RSS feed, by simply dropping it into the vWriter.com system.
Note: This post was updated February 2015 to reflect updates in vWriter.com functionality.


will utilize
It pays to set up your infrastructure and systems properly in the beginning Steve so you can reap the autopilot dividends later on. Thanks for sharing this specific and actionable tactic.
Here are more ideas on increasing organic traffic:
http://www.danhodgins.com/super-specific-tactics-for-increasing-organic-traffic-80-20
Absolutely – automate what you can, within reason of course. Thanks for the post you refer to, the data certainly backs up my points on blog and forum commenting in http://blog.vwriter.com/23-ways-make-next-blog-post-go-viral